Do you need to convert each page of a PDF into an image format such as PNG or JPG in order to use in a video project for Final Cut Pro X?  One of the quickest ways that you can do this is to use Workflow on an iOS device such as an iPad or iPhone.

To do this conversion, follow these steps:

• Install the Workflow app.

• Create a Workflow as an Action Extension with the following steps:

Workflow-PDFtoPNG.jpg

• Open the PDF to convert.

• Tap the Share button in order to access the Share Sheet.

• Choose Run Workflow and select the PDF to Image conversion.


Once you run this Workflow Action Extension, each page of the PDF is exported as a separate image file.

Need to white balance a video in Final Cut Pro X? Watch this video to see how you can quickly and easily do color correction for white balancing a video clip in Final Cut Pro X.


 For more from Bascomb Productions, subscribe to the YouTube channel or subscribe via Twitter.

Copyright 2018 - Bascomb Productions

Do you need to blur out or pixelate someone's face in Final Cut Pro X in order to hide their identity?  Watch this video to see how you can easily censor someone's face in Final Cut Pro X.

For more from Bascomb Productions, subscribe to the YouTube channel or subscribe via Twitter.

Copyright 2017 - Bascomb Productions

How do you adjust the easing of the Ken Burns effect in Final Cut Pro X?  Watch this video to see how you can quickly and easily change the animation style of zooming in and out of photos in Final Cut Pro X.
 

When you adjust the easing of the Ken Burns effect in Final Cut Pro X, you have four choices: "Ease In And Out", "Ease In", "Ease Out" and "Linear".


For more from Bascomb Productions, subscribe to the YouTube channel or subscribe via Twitter.

Copyright 2017 - Bascomb Productions


Posted
AuthorBascomb Productions

How do you take a video editing project that you began in iMovie for iOS on your iPhone or iPad and move it to Final Cut Pro X on macOS?  Watch this video to get an overview of the steps you'll need to take to convert or transfer your mobile project to the desktop.

For more from Bascomb Productions, subscribe to the YouTube channel or subscribe via Twitter.


Copyright 2017 - Bascomb Productions

Posted
AuthorBascomb Productions

Do you need to change the location of your render files or cache in Final Cut Pro X to better use the different drives on your Mac?  Watch this video to see how you can easily change the hard drive location from inside the Final Cut Pro Library to a location of your choosing.

Why would you want to change the location of render files in Final Cut Pro X?  Since render files can get very large, you may find that you want to locate them separately from your Library so that you can make better use of your system's hard drive space.


For more from Bascomb Productions, subscribe to the YouTube channel or subscribe via Twitter.


Copyright 2017 - Bascomb Productions

Posted
AuthorBascomb Productions

Are you upgrading to Final Cut Pro X and need to send over all of your iMovie videos and projects?  Watch this video to see how you can quickly and easily convert your iMovie Library to a Final Cut Pro X Library.

When you convert an iMovie Library, Events are created for each Event in the iMovie Library as well as Each Project in the iMovie Library.


For more from Bascomb Productions, subscribe to the YouTube channel or subscribe via Twitter.


Copyright 2016 - Bascomb Productions

Posted
AuthorBascomb Productions

How can you export an MP3 audio file in Final Cut Pro X?  Watch this video to see how you can create a Destination (or preset) to save an MP3 file of your audio.

For more from Bascomb Productions, subscribe to the YouTube channel or subscribe via Twitter.


Copyright 2016 - Bascomb Productions

Posted
AuthorBascomb Productions

How can you show the original source timecode of a clip in Final Cut Pro X?  Check out this video to see how easy it is to burn in the Source Timecode using an Effect in version 10.3.

Why would you want to reveal the original timecode of a video clip?  The Source Timecode serves as an absolute reference to the original media of a video clip.

For more from Bascomb Productions, subscribe to the YouTube channel or subscribe via Twitter.


Copyright 2016 - Bascomb Productions

Posted
AuthorBascomb Productions

How can you delete all of the render files for all of a Library’s Projects and Events in Final Cut Pro X?  Watch this video to see how you can free up disk space on your Mac by clearing out Final Cut Pro X's render files in version 10.3.

For more from Bascomb Productions, subscribe to the YouTube channel or subscribe via Twitter.


Copyright 2016 - Bascomb Productions

Posted
AuthorBascomb Productions

Have you shot wide dynamic range video footage with a Blackmagic camera or a Sony A7RII?  Watch this video to see how you can properly setup Log Processing for clips in Final Cut Pro X.

Many popular cameras today shoot with a wide dynamic range.  This footage has a "flat" look and needs to be compensated for either through color correction or by properly identifying the look that the footage was shot in.

For more from Bascomb Productions, subscribe to the YouTube channel or subscribe via Twitter.


Copyright 2016 - Bascomb Productions

Want to create an opening crawl in Final Cut Pro X for your Star Wars fan film?  Watch this video to see how you can easily set the stage for your space adventure in a galaxy far, far away.

By changing the Speed Control from Fixed to Automatic, the speed of the opening crawl relates directly to the length of the title clip.

The version of Final Cut Pro X used in this tutorial is 10.2.2.


For more from Bascomb Productions, subscribe to the YouTube channel or subscribe via Twitter.


Copyright 2015 - Bascomb Productions

How can you create a Project with a custom frame size in Final Cut Pro X?  Watch this video to see how you can set any resolution for a project.

You can also select standardized formats such as 4K, 4:3, and many more via the Format drop-down menu.


The version of Final Cut Pro X used in this tutorial is 10.2.1.

For more from Bascomb Productions, subscribe to the YouTube channel or subscribe via Twitter.


Copyright 2015 - Bascomb Productions

Posted
AuthorBascomb Productions


Editing is a process.  Developing your edit in stages gives you the ability to reach goals, to reflect and to iterate.  It’s important to have a creative process like this in order for your video to be all that it can be.

Keeping the versions of an edit organized can be cumbersome, but here is a method and a naming convention that can help with project organization in Final Cut Pro X.


Stages

Let’s consider some possible stages for a medium sized project where the workflow needs approval by a client at different stages in development:


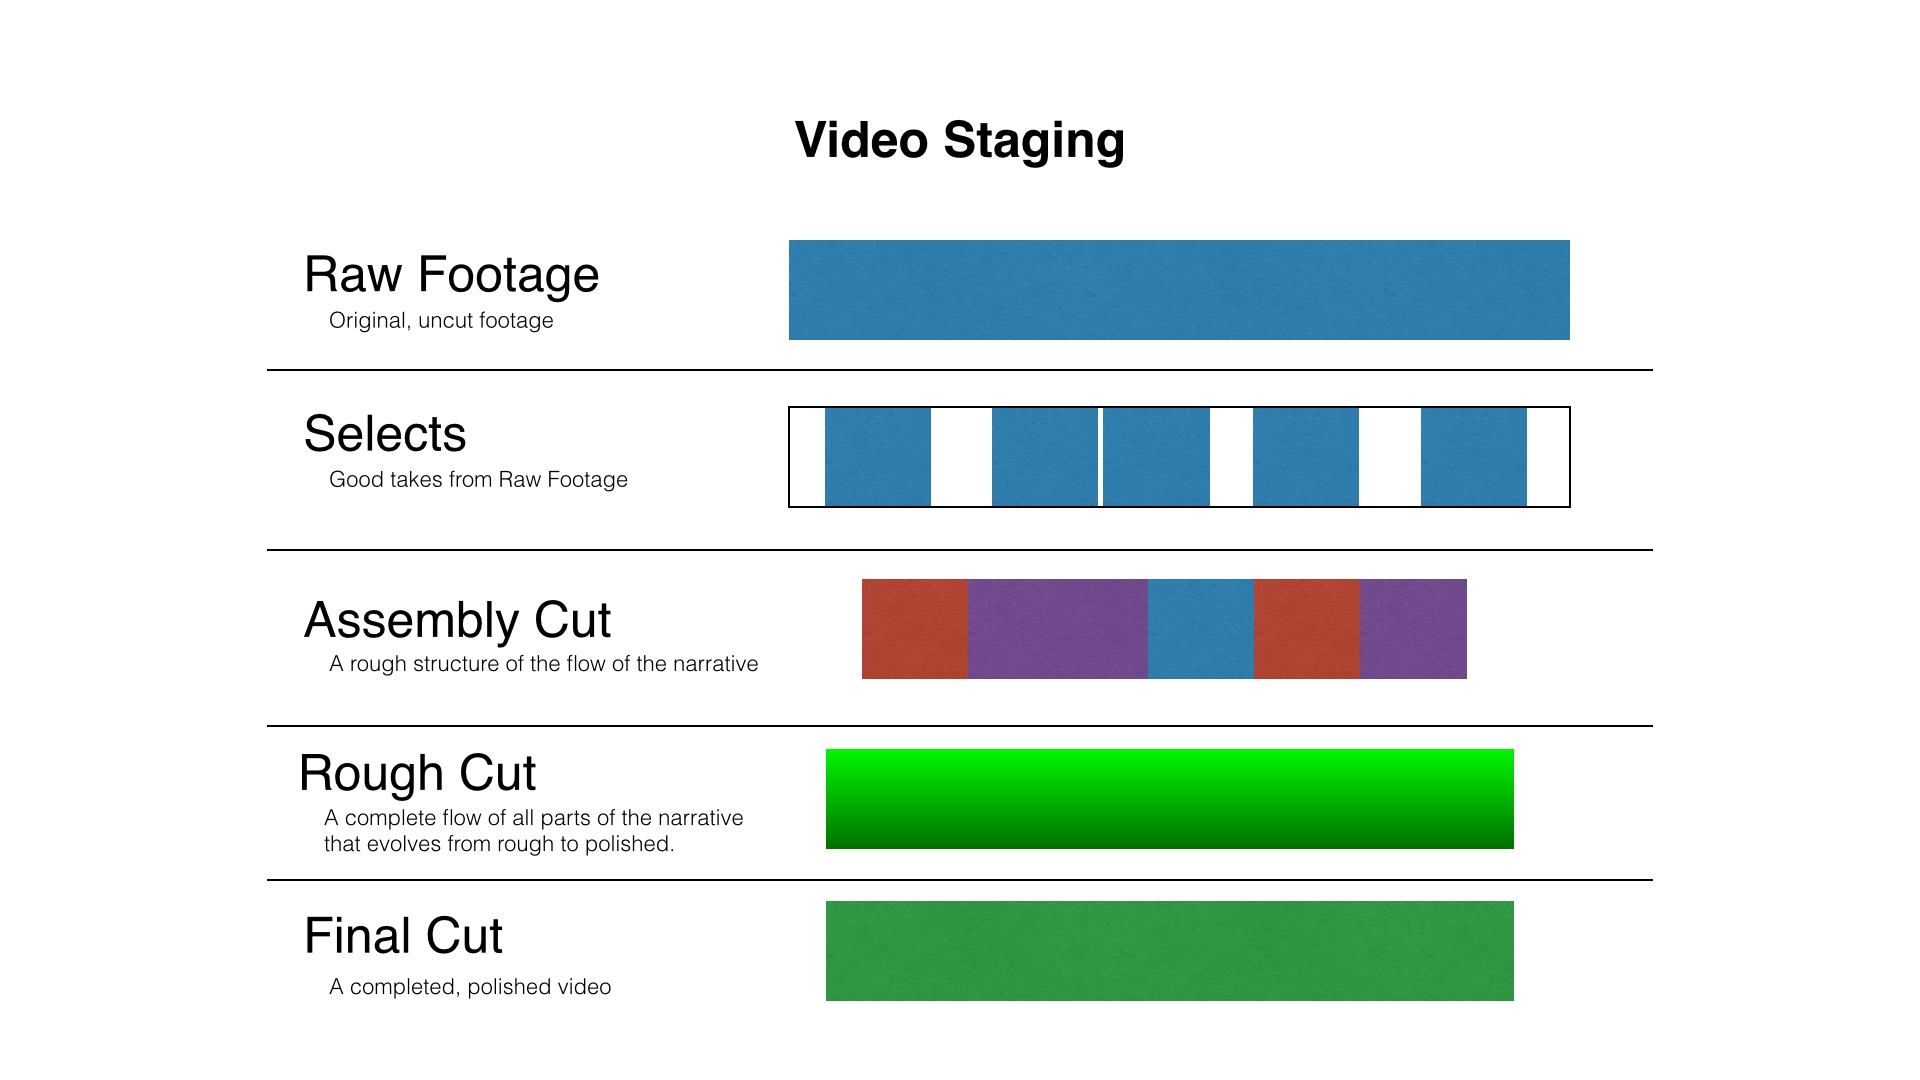
Raw Footage - The Raw Footage stage is where footage is unorganized and is in its original, uncut state for a project.  This is the starting point that every editor faces: the raw ingredients.

Selects - The Selects stage is where you select the usable pieces and good takes from the Raw Footage.  This stage is about thinning down what you have to work with.

Assembly Cut - The Assembly Cut stage is a rough structure of the flow of the project’s narrative.  If you’re doing a video where interviews drive the narrative, this is a cut that puts together only your interview clips and allows you to build the major structure of the story.

Rough Cut - The Rough Cut stage is a complete flow of all parts of the narrative.  The Rough Cut builds upon the Assembly Cut by taking your core story and growing it into a rich and layered video.  The rough cuts will contain place holders or temporary elements of additional footage, animation and music.  As a rough cut evolves, elements become finalized.  The Rough Cut stage is about refinement 

Final Cut - The Final Cut stage is a complete, polished video and is ready for review and approval.


Approvals and iterations happen within each of the three stages of cuts.  Once you get the main structure of your video in place (the Assembly Cut), you move to making that structure a refined and rich experience.(the Rough Cut)  Once you have refined your cut to the point it feels done, you create a final candidate.(the Final Cut)  Each stage can have multiple versions.

Like any process, you may reach points where you have to step backward to go forward.  If you find that a Rough Cut is not working like you hoped, you may need to step back to an Assembly Cut and work on the main structure of your story to fix issues that you may have.


Project Naming Convention

With these video stages in mind, you can apply a standard naming convention to the timelines you create.

The convention I use is Letter + Number followed by Stage.  Project timelines get names such as “A4 Assembly”, “R8 Rough” and “F4 Final”.

The parts of the convention are defined as:
Letter = A for Assembly, R for Rough Cut, F for Final Candidate
Number = 1, 2, 3, etc. (the version)
Stage = Assembly, Rough or Final

For example, if you’re working on your fifth rough cut of a video, the project would be named “R5 Rough”.  While having both “R” and “Rough” in the title for identification seems to be redundant, its need becomes obvious when sorting your projects in Final Cut Pro X.


Smart Collections in Final Cut Pro X

In Final Cut Pro X, Smart Collections are filters that allow you to focus in on just the elements that you want to see from the total set of media in your project.

Think of it like email organization: an old approach was to let the user organize their emails by sorting emails into folders; a modern approach is to put all of your emails in to one location and search on what you need.

The same goes for elements in Final Cut Pro X Events: there are no defined “folders” or “buckets” to organize your content into; Rather, there is one bucket and you create filters to see what you want.

To organize the versions of your cuts, you can create Smart Collections based on the name of the stage of the Project.  You will first filter by “Type” to show you Projects.  Then, you will filter by text in order to see the cuts you want.  If you want to see all of your Assembly cuts, filter by text that includes “Assembly”.  Repeat this for “Rough” and “Final” and you’ve got a quick way to see and organize the different cuts of a project.

Posted
AuthorBascomb Productions
2 CommentsPost a comment

Being able to edit video projects where the project elements are in the cloud has seemed like an unrealistic goal for all but very high end productions… until now.  Improvements in internet connection speeds and cloud storage have risen to a level where editing and syncing small projects stored in the cloud is possible.

This is not a perfect system and it has not been thoroughly tested, but if this system suits your needs, it could be an exciting first step towards online collaboration between video editors.

The key to accomplishing the collaboration is having a Final Cut Pro X library shared via Dropbox between editors and having that library’s cache stored locally for each editor.  In other words, the editing database and original media are stored in the cloud, but render files are stored locally.

Note: This workflow could also be done with the original media being stored locally as well (each editor having a copy of the original media on a local drive), but a goal of this is to store the original media in the cloud.


THE GOALS

  • Collaborate on a Final Cut Pro X editing project where the editors are in different physical locations.
  • Backup the original media and the project database to cloud storage.


REQUIREMENTS

  • Final Cut Pro X
  • Cloud storage that syncs and shares between editors.  Dropbox’s Pro plan with 1TB of storage is an excellent solution for this.
  • Only one editor can work on a FCP X library at a time.  In order to know who is currently editing the library, use Finder labels to identify if it’s safe to open the library or not.  Use red for “In Use” and green for “OK to open”.


WORKFLOW

Here are the steps to this workflow:
1. Setup a folder in Dropbox that is shared between editors.
2. Create a Final Cut Pro X library in this Dropbox folder.
3. Setup the Final Cut Pro X library as a Managed Media library.(in other words, the imported media will be stored within the library and will therefore be synced to Dropbox)
4. Setup the Final Cut Pro X library to use local cache.  When other editors open the library, they will need to set this for their system.
5. One editor can import media and begin editing.  This first editor will need to allow time for Dropbox to sync the media to its servers.
6. When work on the project is done, the editor will need to close the library.  Once the library is closed, change the Finder label of the library file to green to indicate that another editor may open.

After this initial setup is done, each editor will need to follow and repeat the steps below for cloud collaboration:
1. Sync all files from the Dropbox folder for the project.
2. Before opening the library, change the Finder label of the library to red.
3. Open and edit the Library.
4. When finished with editing, close the library and change the Finder label to green.


Note: You will also need to share/sync any custom Motion Templates that are used in the project.


BENEFITS

  • Collaboration between editors is possible if the editors follow the rules of checking a project in and out.
  • The Final Cut Pro X library and original media is backed up in the cloud, providing extra insurance for project recovery should disaster strike.


CONSTRAINTS

  • There are two major constraints, both of which will improve in the future given better technology: the speed of your internet connection and the amount of available cloud storage.
  • The amount of time it takes to upload/download the original media for a project could be significant given a slow connection speed.
  • Depending on the size of your project, 1 TB of Dropbox space may not be enough space to store your raw media.


THINGS TO LOOK OUT FOR

This workflow is not without its potential hurdles.  Sharing and rendering may fail according to an article by Apple.  Click here to read the article as well as an easy fix in case you run into issues.


For more from Bascomb Productions, subscribe to the YouTube channel or subscribe via Twitter.

Copyright 2014 - Bascomb Productions

Posted
AuthorBascomb Productions
3 CommentsPost a comment

How can you delete all of the proxy media for all of a Library’s Projects and Events in Final Cut Pro X?  Watch this video to see how you can free up disk space on your Mac by clearing out Final Cut Pro X's proxy media in version 10.1.2.

By deleting a Library's proxy media, all of the proxy media for all of the projects in the library are deleted.  To be more selective, you can also delete the proxy media of an Event instead of a Library.

To delete proxy media in Final Cut Pro X 10.1 or 10.1.1, review this page.


For more from Bascomb Productions, subscribe to the YouTube channel or subscribe via Twitter.


Copyright 2014 - Bascomb Productions

Posted
AuthorBascomb Productions

How can you delete all of the render files for all of a Library’s Projects and Events in Final Cut Pro X?  Watch this video to see how you can free up disk space on your Mac by clearing out Final Cut Pro X's render files in version 10.1.2.

By deleting all of a Library's render files, all of the render files for all of the projects in the library are deleted.  To be more selective, you can also delete the render files of an Event instead of a Library.

To delete render files in Final Cut Pro X 10.1 or 10.1.1, review this page.

To delete render files in Final Cut Pro X 10.0 to 10.0.9, review this page.


For more from Bascomb Productions, subscribe to the YouTube channel or subscribe via Twitter.


Copyright 2014 - Bascomb Productions

Posted
AuthorBascomb Productions

Final Cut Pro X is ready to edit 4K video, but how do you find additional content that is also 4K ready?  Watch this video to see how you can easily filter to see which content is ready for 4K projects in Final Cut Pro X.

In order to see the "4k-ready content only" checkbox, you must have a 4K project opened.  If you have an HD project or lower resolution project opened, you will not see the 4K checkbox.


For more from Bascomb Productions, subscribe to the YouTube channel or subscribe via Twitter.


Copyright 2014 - Bascomb Productions

Posted
AuthorBascomb Productions